Settings
The Settings page is the central configuration hub for the security camera. It's organized into six scrollable sections with a sidebar (desktop) or tab bar (mobile) for quick navigation.
http://<raspberry-pi-ip>:3000/settings
You can link directly to a section using a URL hash: /settings#camera, /settings#devices, etc.
Appearance
Theme
| Mode | Behaviour |
|---|---|
| System | Follows your OS light/dark preference |
| Light | Always light |
| Dark | Always dark (default) |
Saved in localStorage, applied immediately without a page reload.
Language
Five languages are supported:
| English | Deutsch | Francais | Espanol | Italiano |
Changing the language reloads the page to apply translations everywhere. On first visit, the dashboard detects your browser language and falls back to English if no match is found.
Scan lines
A cosmetic CRT-style scan line overlay on the live video feed. Enabled by default. Toggle it off for a clean image. Saved to the server.
Captive portal
Controls whether the AP captive portal popup appears when devices connect to the Pi's WiFi access point. Enabled by default. When disabled, the iptables redirect rule is removed and devices no longer see the popup. Only relevant when the Pi is running as an access point (see WiFi setup).
Camera
Rotation
Set the camera rotation to match your physical mounting orientation.
Angle: 0 | 90 | 180 | 270 degrees (default 0)
- Display Only (default)
- Apply to Stream
Rotates the image in the browser via CSS transform. Zero CPU cost. Recordings are saved unrotated. Supports all four angles.
Rotates at the MediaMTX/camera level so recordings are saved rotated.
The Pi's H.264 hardware encoder only supports 0 and 180 degree rotation. Selecting 90 or 270 in stream mode will show a warning - these angles may fail or fall back to software encoding.
Changes auto-save when you select an angle or switch modes.
Stream resolution and framerate
A preset dropdown organizes options by camera module. Recommended presets are marked with a star.
- Common
- OV5647 (v1, 5 MP)
- IMX219 (v2, 8 MP)
- IMX477 (HQ, 12.3 MP)
- IMX708 (v3, 12 MP)
Works with all camera modules.
| Resolution | FPS | Notes |
|---|---|---|
| 640x360 | 30 | Lightweight 16:9 |
| 640x480 | 15 | Lowest resource usage |
| 640x480 | 30 | Minimal CPU load |
| 1280x720 | 15 | 720p, lower CPU |
| 1280x720 | 30 | 720p, smooth playback |
| 1920x1080 | 15 | 1080p, lower CPU |
| 1920x1080 | 30 | 1080p, native on all modules |
| Resolution | FPS | Notes |
|---|---|---|
| 1296x972 | 15 | Sharp 4:3, relaxed CPU |
| 1296x972 | 30 | Best balance for Pi Zero 2 W |
| 2592x1944 | 15 | Max 5 MP - exceeds Zero 2 W encoder limit |
| Resolution | FPS | Notes |
|---|---|---|
| 1640x1232 | 15 | Full sensor binned, lower CPU |
| 1640x1232 | 30 | Full sensor binned, best balance |
| 3280x2464 | 15 | Max 8 MP - exceeds Zero 2 W encoder limit |
| Resolution | FPS | Notes |
|---|---|---|
| 1332x990 | 30 | 2x2 binned, lightweight |
| 2028x1520 | 30 | Half-resolution, best balance |
| 4056x3040 | 10 | Max 12.3 MP - exceeds Zero 2 W encoder limit |
| Resolution | FPS | Notes |
|---|---|---|
| 1536x864 | 30 | Binned 16:9, lightweight |
| 2304x1296 | 30 | Native 16:9, best balance |
| 4608x2592 | 14 | Max 12 MP - exceeds Zero 2 W encoder limit |
Presets marked "exceeds Zero 2 W encoder limit" may cause encoding failures on the Pi Zero 2 W. They work fine on Pi 4/5.
Custom: Select "Custom" from the dropdown to manually enter width (320-4056), height (240-3040), and FPS (1-120).
Click Apply to save. The stream may briefly interrupt while MediaMTX applies the new configuration.
Image quality (ISP)
The Raspberry Pi camera's hardware Image Signal Processor handles brightness, contrast, white balance, exposure, denoise, and more - all with zero CPU cost. Click Show preview to see the live feed while adjusting.
Sliders and dropdowns are available for: Brightness, Contrast, Saturation, Sharpness, Exposure Compensation (EV), White Balance, Exposure Mode, Denoise, and Metering. See the Image Quality guide for parameter ranges, defaults, tips, and recommended recipes.
Click Apply to save. The stream restarts briefly (~3 seconds). Click Reset to defaults to return all parameters to factory settings. Settings persist in settings.json and mediamtx.yml across reboots.
Storage
Save location
Click Browse to open a directory picker dialog. Navigate the Pi's filesystem by clicking folders to go deeper, or the back arrow to go up. Click Select to confirm.
Default: ./recordings relative to the client directory.
Below the picker, a metadata line shows the SD card name, manufacturing date, and bytes written since boot (when available from the hardware).
Network storage
You can point recordings to a NAS by mounting a network share and selecting the mount point in the directory browser. See network storage for NFS and SMB mount instructions.
Auto-delete
Prevents the SD card from filling up by removing the oldest recordings when disk usage exceeds a threshold.
| Setting | Range | Default |
|---|---|---|
| Threshold | 10%-95% (step 5%) | 85% |
The check runs before each new recording and every 5 minutes in the background. When enabled, a disk usage bar shows:
- Blue - healthy (well below threshold)
- Amber - approaching (within 10% of threshold)
- Red - exceeded (oldest recordings being deleted)
A thin vertical marker shows the threshold position on the bar. Click Save after adjusting.
With network storage, you can raise the threshold or disable auto-delete entirely since your NAS likely has much more space than the SD card.
Timelapse
Captures periodic still frames and compiles them into a timelapse video at the end of each day.
| Setting | Range | Default | Description |
|---|---|---|---|
| Interval | 1-60 min | 5 min | How often to capture a frame |
| Output FPS | 1-60 fps | 24 fps | Framerate of the compiled video |
| Resolution | Original / 640x480 / 320x240 | 640x480 | Output frame size |
When active, a pulsing green indicator shows the frame count captured today. Click Save after changing settings.
Devices
Manage Bluetooth and WiFi devices for presence detection. When a tracked device is nearby, the system knows someone is home - this gates whether sensor-triggered recordings start. See how auto-recording works for the full flow.
Device presence gates sensor-triggered recordings only. You can always start a manual recording regardless of device presence.
Device status indicators
Each configured device shows a real-time status dot (updated via Server-Sent Events):
| Indicator | Meaning |
|---|---|
| Green dot with glow | Device detected nearby |
| Gray dot | Device not detected |
| Dim gray dot | Status unknown (not checked yet) |
Bluetooth devices
- Scan
- Make Discoverable
- Enter Manually
Click Scan for Devices to run a 25-second Bluetooth discovery. Found devices appear with their name (if available) and MAC address. Click Add to track a device.
When adding a phone, you may need to confirm pairing on the phone itself. A hint appears: "Check your phone to confirm pairing."
Puts the Pi into Bluetooth discoverable mode for 90 seconds. Go to your phone's Bluetooth settings and pair with the Pi from there - useful when scan doesn't find your device.
The countdown persists even if you switch tabs or the page reloads (saved in session storage).
Click Enter Manually in the scan panel to type a MAC address (17 characters, e.g. AA:BB:CC:DD:EE:FF) and an optional name.
Removing: Click the X button on a device row. On desktop it appears on hover; on mobile it's always visible.
Naming: Devices found by scan may not have a name. Type a name in the inline input before clicking Add.
WiFi devices
Same interface as Bluetooth but with a 5-second scan for WiFi stations connected to the Pi's access point. WiFi presence only works when the Pi is running as an access point.
Trigger sensors
Configure a physical sensor connected to the Pi's GPIO pins to automatically trigger recordings.
Auto recording toggle
The main toggle enables or disables the sensor. Status badge shows:
| Badge | Meaning |
|---|---|
| Armed (green) | Sensor enabled and actively monitoring |
| Idle (gray) | Sensor enabled, waiting for presence check |
| Disabled (gray) | Sensor is off |
Sensor type
Select from a grid of 16 sensor types. Selecting a type resets GPIO to the sensor's default and resets calibration. See the sensors guide for the full list with default GPIO pins, use cases, and wiring diagrams.
Wiring diagram
Each sensor type (except Mock) has an expandable Show Wiring section with a visual SVG diagram, pin-by-pin connection table, and sensor-specific notes. For detailed wiring guidance, see the wiring guide.
Configuration
| Setting | Range | Default | Description |
|---|---|---|---|
| GPIO Pin | 0-27 | Varies by type | Which Pi GPIO pin. The suggested default is shown as a hint below the input. |
| Hold Timeout | 0-300 s | 10 s | How long to keep recording after the trigger clears. Set to 0 to stop immediately. |
| Invert Trigger | On/Off | Off | When off: LOW-to-HIGH triggers (active high). When on: HIGH-to-LOW triggers (active low). |
Calibration
Some sensors expose tuning sliders below the main config (PIR sensitivity, vibration/knock pulse threshold, tilt settle time, touch duration). See the Calibration guide for parameter details and tuning tips.
Testing
Click Start Test to enter live test mode. The sensor pin is read every 500ms showing:
- A badge with the current value (1 High / 0 Low) and GPIO pin number
- A sparkline chart of the last 40 readings
Trigger the sensor physically to verify readings change. Click Stop Test when done.
Mock sensor
When Mock is selected and enabled, two buttons replace the wiring test:
- Simulate Trigger - fires the sensor, starting a recording if armed
- Simulate Release - releases the trigger, starting the hold timeout countdown
This tests the full pipeline (trigger, record, hold, stop) without hardware.
Save workflow
- Select sensor type and configure GPIO, hold time, invert logic, and calibration
- Click Save to store the configuration
- Toggle Auto Recording to arm the sensor
- Status badge changes to Armed
The enable/disable toggle takes effect immediately without a separate save.
Security
Authentication
Toggle API authentication to require login for the dashboard and all API requests. When enabled, visitors must enter a password to access the dashboard. Disable only on isolated networks where authentication adds unnecessary friction.
A default password is generated on first startup and written to client/data/default-password.txt. Read it via SSH:
cat /opt/security-cam/client/data/default-password.txt
The file is automatically deleted once you change the password. Change it using the Change password section below.
API token
The API token field shows a token for programmatic access - use it with scripts, curl, or Home Assistant. Click Copy to copy it to your clipboard.
Regenerate creates a new API token and invalidates the old one. All active browser sessions will be logged out and need to enter the password again.
Password recovery
If you forget the password, you can reset auth using the SD card:
- Power off the Pi and remove the SD card
- Insert it into any computer
- Create an empty file called
reset-authon the boot partition (the one withconfig.txt) - Put the card back and power on
Auth will be disabled on next startup and a new default password written to client/data/default-password.txt.
If you have SSH access, you can also reset via the command line:
cd /opt/security-cam/client/settings
python3 -c "import json; s=json.load(open('settings.json')); s['Auth']['enabled']=False; s['Auth']['password_hash']=''; json.dump(s,open('settings.json','w'),indent=4)"
Then restart the service.
System
Settings backup
Export and restore your complete settings configuration. Useful when re-flashing the SD card, migrating to a new Pi, or keeping a backup before experimenting with settings.
- Export downloads
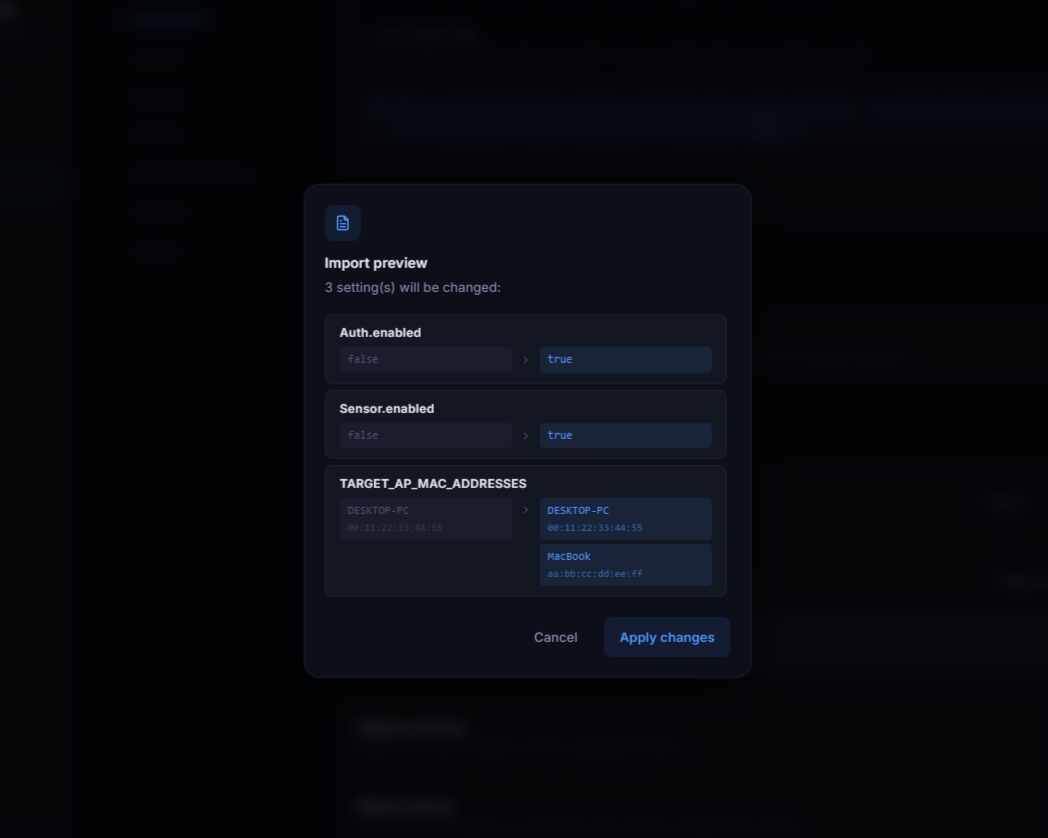
settings-backup.jsoncontaining all settings (devices, sensor config, camera rotation, ISP tuning, storage limits, auth credentials, etc.) - Import opens a file picker to select a previously exported backup. A preview dialog shows which settings will change before you confirm. After a successful import, the page reloads to reflect the restored settings.
The exported file contains auth tokens and password hashes. Store the backup file securely and don't share it publicly.
You can also use the API directly:
# Export
curl -H "Authorization: Bearer <token>" http://<pi-ip>:5005/settings/export -o settings-backup.json

# Import
curl -X POST -H "Authorization: Bearer <token>" -H "Content-Type: application/json" \
  -d @settings-backup.json http://<pi-ip>:5005/settings/import
Software update
The dashboard automatically checks for updates every 12 hours in the background. When updates are available, a blue dot appears on the Settings icon in the navigation bar. You can also check manually by clicking Check for updates.
If updates are available, a summary of new commits is shown with the number of commits behind. Click Update & restart to apply - this restarts the security-cam service, which runs the update script (setup/update.sh) automatically before starting. The update script pulls new code, installs dependencies if needed, and rebuilds the frontend.
The Pi needs an internet connection to check for and download updates. If the check times out, verify the Pi can reach GitHub. The last check result is cached locally so the badge persists across page reloads.
Restart services
Restarts the Flask API and Astro dashboard without rebooting the Pi. The connection drops briefly (~10 seconds) while systemd restarts the security-cam service. Equivalent to running sudo systemctl restart security-cam via SSH.
Reboot device
Performs a full Raspberry Pi reboot. May take a few minutes if update.sh detects code changes and triggers a frontend rebuild. Equivalent to sudo systemctl reboot via SSH.
All three actions require a confirmation click (auto-cancels after 5 seconds). Restart and reboot log an event to the activity timeline.
Navigation
Desktop (1024px+): A sticky sidebar highlights the current section as you scroll. Click a section name to smooth-scroll to it. The URL hash updates to match.
Mobile: A horizontal tab bar at the top serves the same purpose. The active section updates automatically based on scroll position.
Data loading
All settings load in parallel on page mount - the settings file, timelapse status, storage status, and system info are fetched simultaneously. Device presence status updates in real time via Server-Sent Events.